Less is More!
Keeping the Deviation Under Control
Respecting or breaking the technical rules of stereophotography, as well as their particular formulation has always been a precarious topic, and whenever it is brought up, an excited discussion follows. However anyone who deals with stereoscopy must be aware of the fact that it is a multidimensional discipline. Unlike other forms of visual art, it is closely related to the physiology of sight and an inappropriate execution of a stereoscopic image may not only affect the aesthetic perception, but can cause physical discomfort and further inconveniences. Every artist, no matter what art he deals with, has to be a great craftsman to start with. Mastering the craft of stereoscopic imaging is definitely quite demanding, but working among the limitations is a challenge and shouldn't discourage anyone!
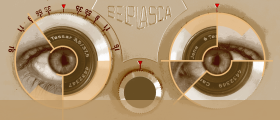
Apart from correct alignment of the images and window placement, which should be a matter of course, the major issue is optimising the amount of depth contained in our pictures. This amount is easily visualised as the horizontal shift of homologous points on nearest and furthermost objects when the two images of the stereo pair are superimposed - visible without glasses on a 3D TV, a projection screen or in an anaglyph. This horizontal difference is referred to as stereoscopic deviation. It is usually expressed either as a percentage or ratio of the image width.
The deviation of an image - separation of the far points.
Anaglyph is not used to view the image stereoscopically but to highlight the differences of the superimposed images.
The deviation is either positive (for objects that appear behind the screen) or negative (for objects that are in front of it). Once the stereoscopic window is respected, most images have only positive deviation. Use of negative deviation is usually limited to special effects - for objects protruding through the window towards the spectator.
The major problem is that the acceptable amount of deviation cannnot be rigidly quantified. It depends mainly on the viewing device, the position of the spectator and on his or her susceptibility - the sensibility to any problems related to stereoscopic vision is highly individual. The requirements will strongly differ if you intend to view the images yourself on a small display, show them on a TV to a group or project them on a huge screen to a big audience - projection is the most demanding.
The generally and historically respected value of maximal positive deviation in projection is 1/30th or 3.3% of the image width.
When it comes to projection, It is important to say it has its own specifics. There is a known phenomenon called "projection stretch". The depth looks enhanced compared to other viewing methods, sometimes to the point of deforming objects and making them look unnaturally distorted along the Z-axis. This in fact reduces the need to take and show images with excessive depth.
Moreover if you are showing a series of stereoscopic images, you do not need to impress the audience by content that is strikingly three-dimensional. The effect that might be interesting in a single displayed image can easily become needles or even annoying when repeated.
It is very important to say the perception depends on the composition of the image. If the background is not very prominent and the vision is focused elsewhere, the image is less likely to be problematic. But in my opinion it is not advisable and could be misleading to judge the acceptability by ourselves, because our eyes are usually much better trained than usual.
Over the years I gradually learn to pay a lot of attention to keeping the deviation conservative, both when taking pictures and during their selection and processing. I would like the most sensible spectator, possibly sitting in the worst seat, to feel comfortable. It is also nice to know the images will not cause any discomfort regardless of the viewing device.
I always do my best not to exceed the 1/30th value. Nowadays I strictly check the deviation of all images intended for projection, and I include the measured number right in the file name whenever it approaches or exceeds 1/30th. Sometimes I project an image that slightly breaks the 1/30th rule and could not be corrected, but at least I know about it - and I can show it for limited time or avoid showing more of them in a sequence as a precaution.
Picture Taking
Although the boundary parameters of the image can be calculated using formulas, it is highly impractical in most cases. You will usually work with intuition and previous experience. Note that the maximum possible deviation does not mean the optimal and natural viewing experience, but is a limit one shoud not go beyond. You can use the formulas to make a table with various values and carry it with your camera - this can help your estimates in the field.

The dependence of the base (b) on the near point (x) and far point (y) distance and the focal length (f, 35 mm equivalent). 1.2 is a constant derived from the width of a full frame image (36 mm / 30, called Maximum On-Film Deviation)

Simplified formula valid for far points at infinity
When taking common images with a stereo base close to natural, it is quite easy to learn to guess the minimum distance to the nearest point. It should be just under two metres for wide angle lenses and will gradually grow as you increase the focal length. Taking stereoscopic photographs requires to have this in mind whenever composing a shot and easily becomes a second nature.
Reducing or extending the base a several times still makes the calculations and estimates quite simple and imaginable. As you change the base, the near point distance changes proportionally and vica versa.
On the other hand, estimating the appropriate base is very hard when using telephoto lenses, or taking hyperstereos, macros, or close-ups without infinity. From my own experience I know I tend to exaggerate the base in most cases. I also found out I am not capable of correctly estimating distances in the range of tens or hundreds of metres.
When taking hyperstereos, I usually try to guess the distance to the nearest point and then I consult a printed table showing dependence of the stereobase on the nearest point distance for various focal lengths. But many previous errors yielding useless photos have taught me to take a series of shots with varying base whenever I have the time and the shot can be repeated. I always start at a value much shorter that my estimate and gradually increase the base.

My proven method of taking hyperstereos - the original estimate of the base is often very inaccurate. Bracketing the base allows me to select the most convenient pair during image processing.
The same applies to close-up and macro shots I take with a beamsplitter macro-box. Whenever I can I systematically take a series of shots with varying bases and select the most pleasing pair in post production. Very often the pictures with subtle bases, resulting in much less deviation than 1/30th, are later chosen as the most natural and pleasing to view.
Dealing With Deviation in Image Processing
Probably the simplest "low tech" method of checking the deviation of an image is to display it at as anaglyph or interlaced at full screen. Measure the width of your monitor or TV with a ruler in mm, inches, or whatever units. Then measure the distance of the far points and divide the two numbers. Some people keep a paper card of the right width at hand and use it to check the deviation on screen.
I learned to constantly keep awarness of deviation during the image selection and editing process in StereoPhoto Maker. Althought the autoalignment process automatically reports the deviation, this value cannot be trusted. The autoalignment is an irreplaceable feature and I apply it as multi conversion to all images, but according to my experience the resulting horizontal setting (window placement) is rarely optimal and needs further adjustment in most cases.
For measuring deviation the most useful tool is the grid, which can be turned on in a dialog box accessible by pressing "Ctrl+g" or in "View" -> "Grid setting". Set the number of vertical lines to 29 (29 lines = 30 columns) to visualise the 1/30th of the image width. The grid also helps with vertical alignment and window placement and I leave it turned on routinely.

The Grid dialog in SPM ("Ctrl+g" or "View" -> "Grid setting")
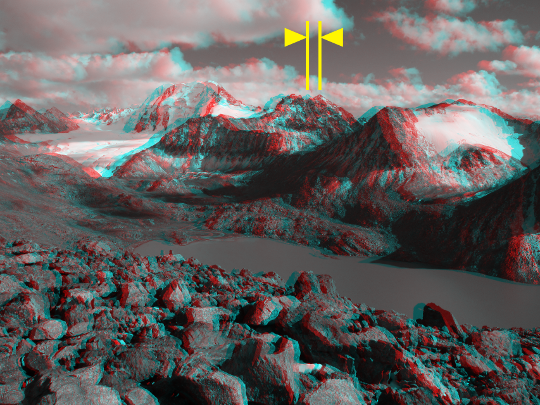
Set the stereo window by shifting the image horizontally using the arrow keys and then display the image as anaglyph ("F6"). Inspect the image without glasses and find a distinctive point on the furthermost object. If the two images of that point are closer to each other than the spacing of the grid then the deviation is less than 1/30th and should be safe. You can alter the grid setting until the grid lines match the far point separation to find out what the actual deviation is. Do not forget to set it back to 29 prior to judging the next image.

The deviation of this image is distinctly smaller than 1/30th - this image should be safe for projection
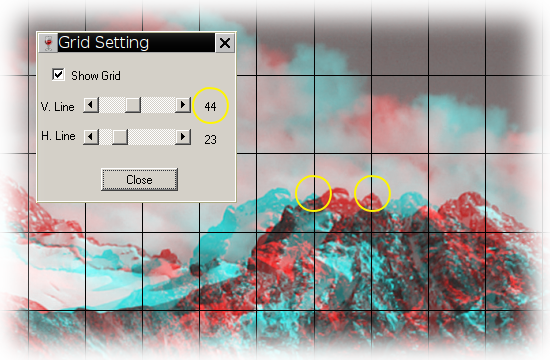
To measure the actual deviation, change the number of vertical lines until their distance matches the far point separation. This image has a deviation of 1/45th (grid set to 44 divides the image into 45 columns)
If the deviation exceeds 1/30th consider what can be done: First of all I look for a more convenient image. If there is no substitute I check whether the depth can be reduced by cropping a part of the foreground and re-adjusting the window. Many times this solution is sufficient, but quite often it will ruin the composition or leave very little depth.
If nothing else helps the image can be sometimes corrected by manually retouching the foreground (shifting it deeper of flattening it), hiding parts of the foreground in a shadow gradient or erasing distant objects (a view through a window in the background of an interior for example), or by unifying the background of both images to one colour or texture. However, making these modifications often requires hours of meticulous work and any imperfections are visible and distracting, so first of all you need to considered whether the image is worth it.
It needs to be said that using the grid in SPM for measuring maximal deviation yields relevant results only if the image fills the entire width of the viewing device or projection screen. If the picture will be shown on a 16:9 aspect ratio device but is narrower, the measured deviation can be recalculated. Otherwise the results will be unnecessarily conservative. Alter the number of vertical lines of the grid until they match the deviation of the furthermost objects an then use this simple formula to get the deviation at 16:9:

The size of the image in pixels is displayed on top of the SPM page next to the file name.
16:9 aspect ratio has become the standard for monitors, TVs and projectors, but I personally still use and prefer a 4:3 projection system so I measure the deviation in relation to my aspect ratio. If my images will be projected on a 16:9 screen my values are on the safe side, probably even more conservative than necessary.
All this effort makes the picture taking and processing considerably more laborious. But the most fulfilling comment I heard several times from the audience was that unlike 3D movies they have seen, the photographs do not cause eye strain or headache. Is this due to keeping the deviation under control? Limiting the depth definitely plays an important role, in my opinion, although there are other relevant aspects. Being aware of the rules should be our responsibility and might be a good way to teach the general public that stereoscopy is not a gimmick but a serious discipline, I believe!